So you want to take a trip…
Congratulations! You’ve read up on our Grand Canyon must-do’s and decided to make the great leap into the outdoors by tackling a rigorous national park: the Grand Canyon. The canyon is no easy task. However, for my very first venture into to backpacking (let alone camping), I would say I was well prepared in every respect. Having excellent and knowledgeable guides is a necessity because once you’re in, you’re basically cut off from the world above. Here are the skills we know most first-time campers should know about.
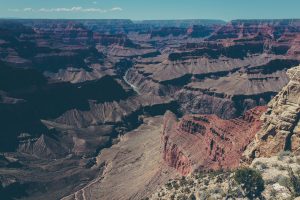
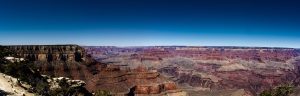
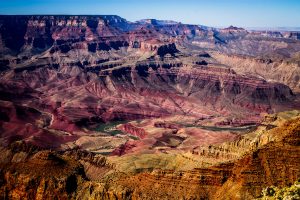
The Grand Canyon is one of nature’s marvels and mysteries. Spanning north of the state of Arizona, its massive length and unique structure are what clearly separate it from any other U.S. national park. People from all over the world book trips years in advance to be able to hike the trails and peer down into the vast canyon.
Since its designation as a national park, the national park service has worked tirelessly to improve the visitor experience at the canyon. They have erected trails, museums, camping areas, lodges, shops, and even a train station along the southern rim.
Let’s go camping!
Have I mentioned you can backpack it?
Backpacking, if you’re not familiar with the term, is the act of taking an extended camping trip for more than one day, usually setting up tents at the end of the day before eventually moving on.
If you’re like me, a complete newbie to the great outdoors, there are some things you should think about at least four or five months before the start of your trip. In addition, the situation depends on the type of group you’re going with. As a beginner, under no circumstances should you be hiking alone.
Once you start your journey, you can expect that sometimes things won’t go according to plan. Here’s what to expect from the wild world of nature and camping in the thick of it.
Pre-Check
Health
You don’t have to be a bodybuilder or heavyweight to hike these trails, but you should be aware of your limits far in advance of your trip. A physical at the doctor’s office and a health check up might be in order (my trip leaders required this). This will make sure you don’t have any lingering issues by the time the trip rolls around.
Check the weather
The Arizona weather is extremely unpredictable. It can be absolutely scorching or freezing depending on the time of year. However, with careful planning, you can take your trip before or far after the heavy snowfall hits. For the purposes of this guide, we will assume that you are taking your trip anytime between November-January.
The reason I say this is that I had a friend go on the same trip a year before me in January, and her group encountered torrential snow. The only snow that my group encountered (in mid-December) the next year was near or at the rim, while the depths of the canyon remained perfectly dry.
Exercises
Depending on the length of your trip and who you travel with, chances are you’ll be carrying your fair share of gear, not to mention food, water, and mobile shelter (tents). All in all my backpack topped out at about 45lbs, with a majority of the weight being my gear for a good five days in the canyon. It was nothing I couldn’t handle but I was nonetheless more than prepared for.
Your lower body, back, neck, and shoulders are going to be taking the brunt of the weight during this trip. The hike down into the depths of the canyon is strenuous on the knees and ankles. The hike out puts more stress on calves and quadriceps (and is likely the most difficult journey).
In order to prepare yourself at the most basic level for this trip-here are some exercises that suited me well:
- Weighted, walking lunges
- Weighted squats
- One legged squats
- Weighted shoulder shrugs
- Leg press/curl
- Calf raises
- Intensive cardio
Stretching
I also mentioned the neck area. For me, my neck was something that I wished I focused on more because I have bad posture overall and that caused enormous tension build up with all the weight on my back. Here are some good stretches that will loosen many areas that might become tight.
- Swing your head from side to side sharply so as to feel a pull on both sides of your neck
- The “Good Morning” Stretch: try to touch your toes (while taking quick breaths to extend lengths). Then reach for the sky and try to touch the ceiling.
- Neck rolling
Conducting these exercises and stretches constantly at least four or five months before your trip should keep you pain and stress-free, but again, it all depends on what you decide to carry in your backpack and if you’re traveling with a group.
(Including Icy Hot or a similar tension relief ointment to your gear will greatly benefit you should tension flare up.)
Gear
This is the fun part, the part where you get to see if all the money you spent is going to withstand the full-on assault by mother nature. For my trip, my guides recommended that I search at local or 3rd party stores before going to high-quality stores such as REI, Patagonia, Mountain Hardware, etc.
We’ll start with the essential gear before we move onto clothing, cooking utensils, and other miscellaneous items.
- Tents-Make sure these have a rain covering in addition to the actual tent. When folded, they should fit into the side pockets of your backpack. Some tents are designed to sleep only a certain amount of people, but we’ve reviewed some of the best out there.
- Backpack w/attached brain: The backpack I was provided with had multiple pockets and straps to fit the maximum amount of gear possible. You don’t want to be carrying anything in your hands except your hiking poles. Most large backpacks have a large “brain” at the top near your head for easy access to valuables and smaller items.
- Zero-degree sleeping bag: A normal sleeping bag simply won’t cut it-you’ll lose too much body heat at night, and the canyon’s temperatures can and will drop below freezing at night. These specially designed sleeping bags look like cocoons and if zipped properly, only leave your face exposed to the elements (preferably beneath a tent). Here are our reviews for the top sleeping bags, but remember, you are looking for the zero-degree bags.
- Interior Liner: The liner, a small bag like structure of varying materials goes inside your sleeping bag and extends to about your upper thighs. This provides added warmth for your lower body.
- Heat absorbent pad: This pad is designed to absorb body heat at night and reflect it back to your sleeping back. You can usually identify them by their differentiating colors. A dark color (mine was forest green) was on the outside, and the silvery reflective side was the one I lay on. This pad rolls up and is usually strapped to the bottom of the backpack or the very back of it. Check out our reviews of the best sleeping pads of 2018.
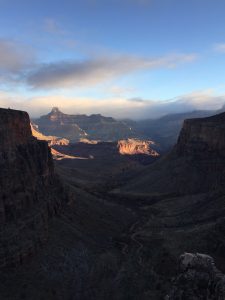
- Headlamp: The sun does not last long in the skies above the canyon, and is quickly obscured by the towering canyon walls. It is absolutely imperative that you find a good headlamp and bring spare batteries (4) to better aid in the darkness. If this option is too pricey, a good flashlight will do. Check out our reviews top headlamps and flashlights of 2018.
- Hiking Boots/Shoes: Boots or shoes will be okay for this trip. You want your boots to be waterproof. Whether you get caught in a downpour or a puddle or stream proves to be deeper than you thought, you want to know your shoe is going to keep your feet dry. There is a wide variety of footwear to shop from, and everybody’s feet differentiate on comfort levels. Men and women will obviously have different tastes from each other as well. Head over to our reviews of the top outdoor shoes and boots of 2018.
- Ice Chains: These chains look similar to the ones that cover tires of a car. However, these ones go on the bottom of your boots or shoes and help with traction on slippery or icy surfaces. I recommend that you try to see chains in person, usually with your boots in hand so as to gain a better perspective of what you are purchasing.
- Running Shoes: Chances are, once you make camp, your hiking boots/shoes are going to feel a little bothersome on your feet after hiking a number of miles. If you just want to walk around camp or walk a short distance. Some running or athletic shoes will come in handy. Any other sneaker or fashion shoe will not support your feet well here. I carried Reeboks.
- Gloves-I took two pairs of gloves, one was a lightweight-woven pair and the other was a mitten-hybrid that fit over those. However, it was sort of tedious to get them on and off again, so a single pair that is insulated (but not ski/snowboard gloves), will do just fine.
- Mobile Stove: These stoves should be foldable and small enough to carry in your backpacks. Here are our tips for finding the most affordable and accessible camping stove.
- Foil Walls: The foil acts as a barrier to trap heat near and in the stove when it’s heating water or food.
- Gas Canisters: Supplies the gas necessary to light the stove.
- Water Bags: Depending on how big your party is, the water stored in these bags can be used to heat up and make coffee, hot chocolate, and warm up food. Check out our tips for keeping your water bacteria free during your trip. Always, always fill up your water bottles and bags to the brim whenever possible.
- Freeze Dry Food: Ready and easy to make meals are going to be a priority down in the canyon. Whether it’s freeze dry or other foods that don’t require much labor, you’re not going to be feasting down in the canyon. The foods you bring should be small but contain a big enough protein and carbs supply to give you lots of energy for each day. Check out our recommendations for the best on the go meals. If you’re looking for a little added sugar, sift through our dessert list.
Clothing/Shoes/Hats
As I mentioned before, I’ll bet you can find a good 75% of what you need at stores that sell items at a fraction of the price that most high-end retailers do. That’s nothing against high-end retailers, but if you’re looking to save money, always do your research (preferably in person) beforehand.
Clothing necessities will differ for men and women, but the key is to preserve as much body heat as possible while maintaining comfort. There’s no washer or dryer down there and barely any dedicated electricity, so you’ll be wearing pairs of clothes over again repeatedly.
Here’s a tip: As you’re settling down for the night, put the clothes that you will be wearing tomorrow at the deep end of your sleeping bag, towards your feet. When your bag is all sealed up, your clothes for tomorrow will accumulate the heat that you generate while you’re sleeping. You won’t have to worry about putting on cold clothes the next morning.
Underwear
- Mid-length underwear: Being very active, I had a lot of spandex and sports underwear already. Brands such as Under Armour, Addidas, Nike, and Spyder are the ones I recommend. I carried 3 pairs during the five-day trip. Try and avoid dedicated sports underwear, as those usually have seams that are itchy and rub against your skin.
- Long underwear (Tights): I wore these over my mid-length underwear, despite the tightness. At least for my trip, I could have done without the mid-length underwear because it wasn’t as consistently cold as the year before. However, long underwear is ultimately necessary if you’re not thinking about bringing mid-length underwear. I brought 2 pairs of Under Armour tights.
Shirts
- Dry Fit/Wicking Shirts: These shirts are the lightweight, loose kind that regulate sweat and water. They also dry easily. These are the type you’ll commonly see people working out it. I carried 3 of these with me on the trip.
- Normal long sleeve shirt (Cotton/Synthetic): Any long sleeve shirt will do with the appropriate materials. Remember, the key is to retain body heat. If you’ve already got your dry fit short sleeve shirts under this long sleeve one, then you’re keeping water off your skin (which causes blisters).
Lower Body
- Quick Dry Shorts: If the temperature and conditions are right, you’ll be able to wear quick dry shorts on top of your underwear. Wearing pants for too long will build up your body heat, and it’s never good to have too much of it. These shorts are similar to swim trunks but not exactly athletic shorts. There are many different types out there, but make sure yours can dry quickly as that is why you’re bringing them in the first place. I brought 2 pairs of a 3rd party brand.
- Quick Dry Pants: Many of those on my trip wore dedicated hiking pants which work well. However, I found a cheaper pair of pants (fleece) that looked a lot like sweats. These kept my legs very warm and also dried easily (not that I was swimming in the Colorado River with them or anything). Remember-body heat retention and comfort. You won’t be wading through rivers, but you may encounter streams and ponds that may be a little deep. I brought one pair of the RBX brand.
- Fleece/Synthetic/Down Jacket: For me, these were heavy sweatshirts that had good insulation. There are sweatshirts out there that are pretty thin, so make sure yours have good padding underneath and preferably a hood. I brought 2 pairs.
- Rain Jacket and Pants: When it rains down in the canyon, it rains hard. Your jacket needs to be waterproof, not water resistant, otherwise, you’ll have another clothing item getting soaked. A hood is a necessity on the jacket as well.
- Fleece Jacket: An extra coat or jacket over your main down sweat-shirt/jacket will probably be your outermost layer. I brought one.
- Liner Socks: These socks should be worn against your own skin, are very lightweight and protect against blisters. I carried 3 pairs.
- Hiking Socks: Worn on top of liner socks, they provide extra padding, warmth, and support. These should not be cotton, and so make sure you air yours out at the end of the day. I carried 3 pairs.
Hats and Face
- Warm Hat: These hats can be of the woven or wool type that go over your ears. Basically, they cover ears, which can get cold quick.
- Baseball Hat: For when it’s sunny but the temperature is too high for a warm hat.
- Bandana: For cleaning, sweat, grime, and snot.
- Face mask: My face mask was designed to cover up to my nose and the top of my head. It, along with my bandana, kept the majority of my face warm.
- Handkerchiefs/Kleenexes: If you’re like me have your nose runs due to exposure to allergies and the cold, then handkerchiefs or kleenexes will be a necessary investment.
- Sunglasses
Miscellaneous
If you need to bring prescriptions such as contacts, glasses, or medications—then by all means, do so. Some extra Ziplocs or plastic bags for extra storage might be in order but chances are you’ll probably use a majority of your food and limited supply items by the time your trip is over.
Here we will explore some miscellaneous items that might fit better in the brain of your backpack as opposed to the actual pack.
- Tupperware and cup with fork/knife/spoon: The Tupperware will help you heat larger meals without the need of a plate. You can simply rinse it off with the water from a water bag or use the water stations at some of the base camps. A cup will be useful for coffee, hot chocolate, or any other drink. A knife and spoon (or even sporks) will work great and it would be even better if they were linked so not misplace them.
- Water Bottles: I brought 3, one-liter bottles.
- Toiletries: There is almost no electricity down in the canyon, so everything needs to be done by hand. Shampoo and body wash are unnecessary.
- Moleskin: Your liner socks may not completely protect you from excess heat and moisture buildup on your feet. Moleskin looks like band-aids but is specifically designed to keep irritated areas of skin dry. If you feel any patch of skin become irritated and uncomfortable, stop immediately and apply moleskin to the affected area. Once it’s applied, slip your socks back over and you’ll be good to go.
- Lip Balm
- Sunscreen
Tips, Pointers, and Advice
No national park is the same, and while this guide was created solely out of what I experienced in the Grand Canyon, there’s no harm in assuming you can transfer much of the gear, clothing, etc. in this guide to another national park. It’s the things such as weather and environment (unpredictability) that you should be aware of when you begin to plan a backpacking trip.
- If you think you have enough space left over, carry a pillow in your backpack. I didn’t have one, as I used my rolled up sweatshirts as a headrest at night. However, it would have been more comfortable. Head over to our reviews of the best hiking pillows.
- It is better to be overpacked than under-packed, but make sure that you are comfortable and secure carrying what is in your backpack.
- Plan and book your trip far ahead of time. Chances are you’ll be competing with a lot of people to get camping spots at the two primary base camps-Phantom Ranch and Indian Garden. Like I said earlier, the weather is unpredictable and there’s no telling for certain what you might encounter.
- Speak with the Rangers or national park service who are down in the canyon if you have any questions or concerns. They are trained for the most extreme situations.
- Keep warm, but not too warm! Blisters can grow quickly even in the most extreme conditions and can become painful if they are not addressed immediately.
- Take a night hike and get a clear view of the night sky. Trust me, you won’t be disappointed.
Most importantly, have fun! Try and use your time from sun up to sun down to explore everything within reach. Trips like these to the Grand Canyon or other parks can be pricey, and you should get as much out of each day as possible.
Leave a Reply